Heatmiser Neo Wiring Diagram

The next step is to join the neoStat V2 to the neoHub, we recommend joining the neoStat V2 located nearest to the neoHub first. To add a neoStat V2, follow these steps; • In the app, select ADD NEOSTAT, enter a preset or custom title, then press NEXT. • You now have two minutes to join the neoStat V2 to the neoHub.
Heatmiser Neo Wiring Diagram

Video tutorial - How to use Comfort Levels on neoStat V2? 6 months ago. Updated. Follow.
Heatmiser neoStatHW, Hot Water Programmer The Underfloor Heating Store

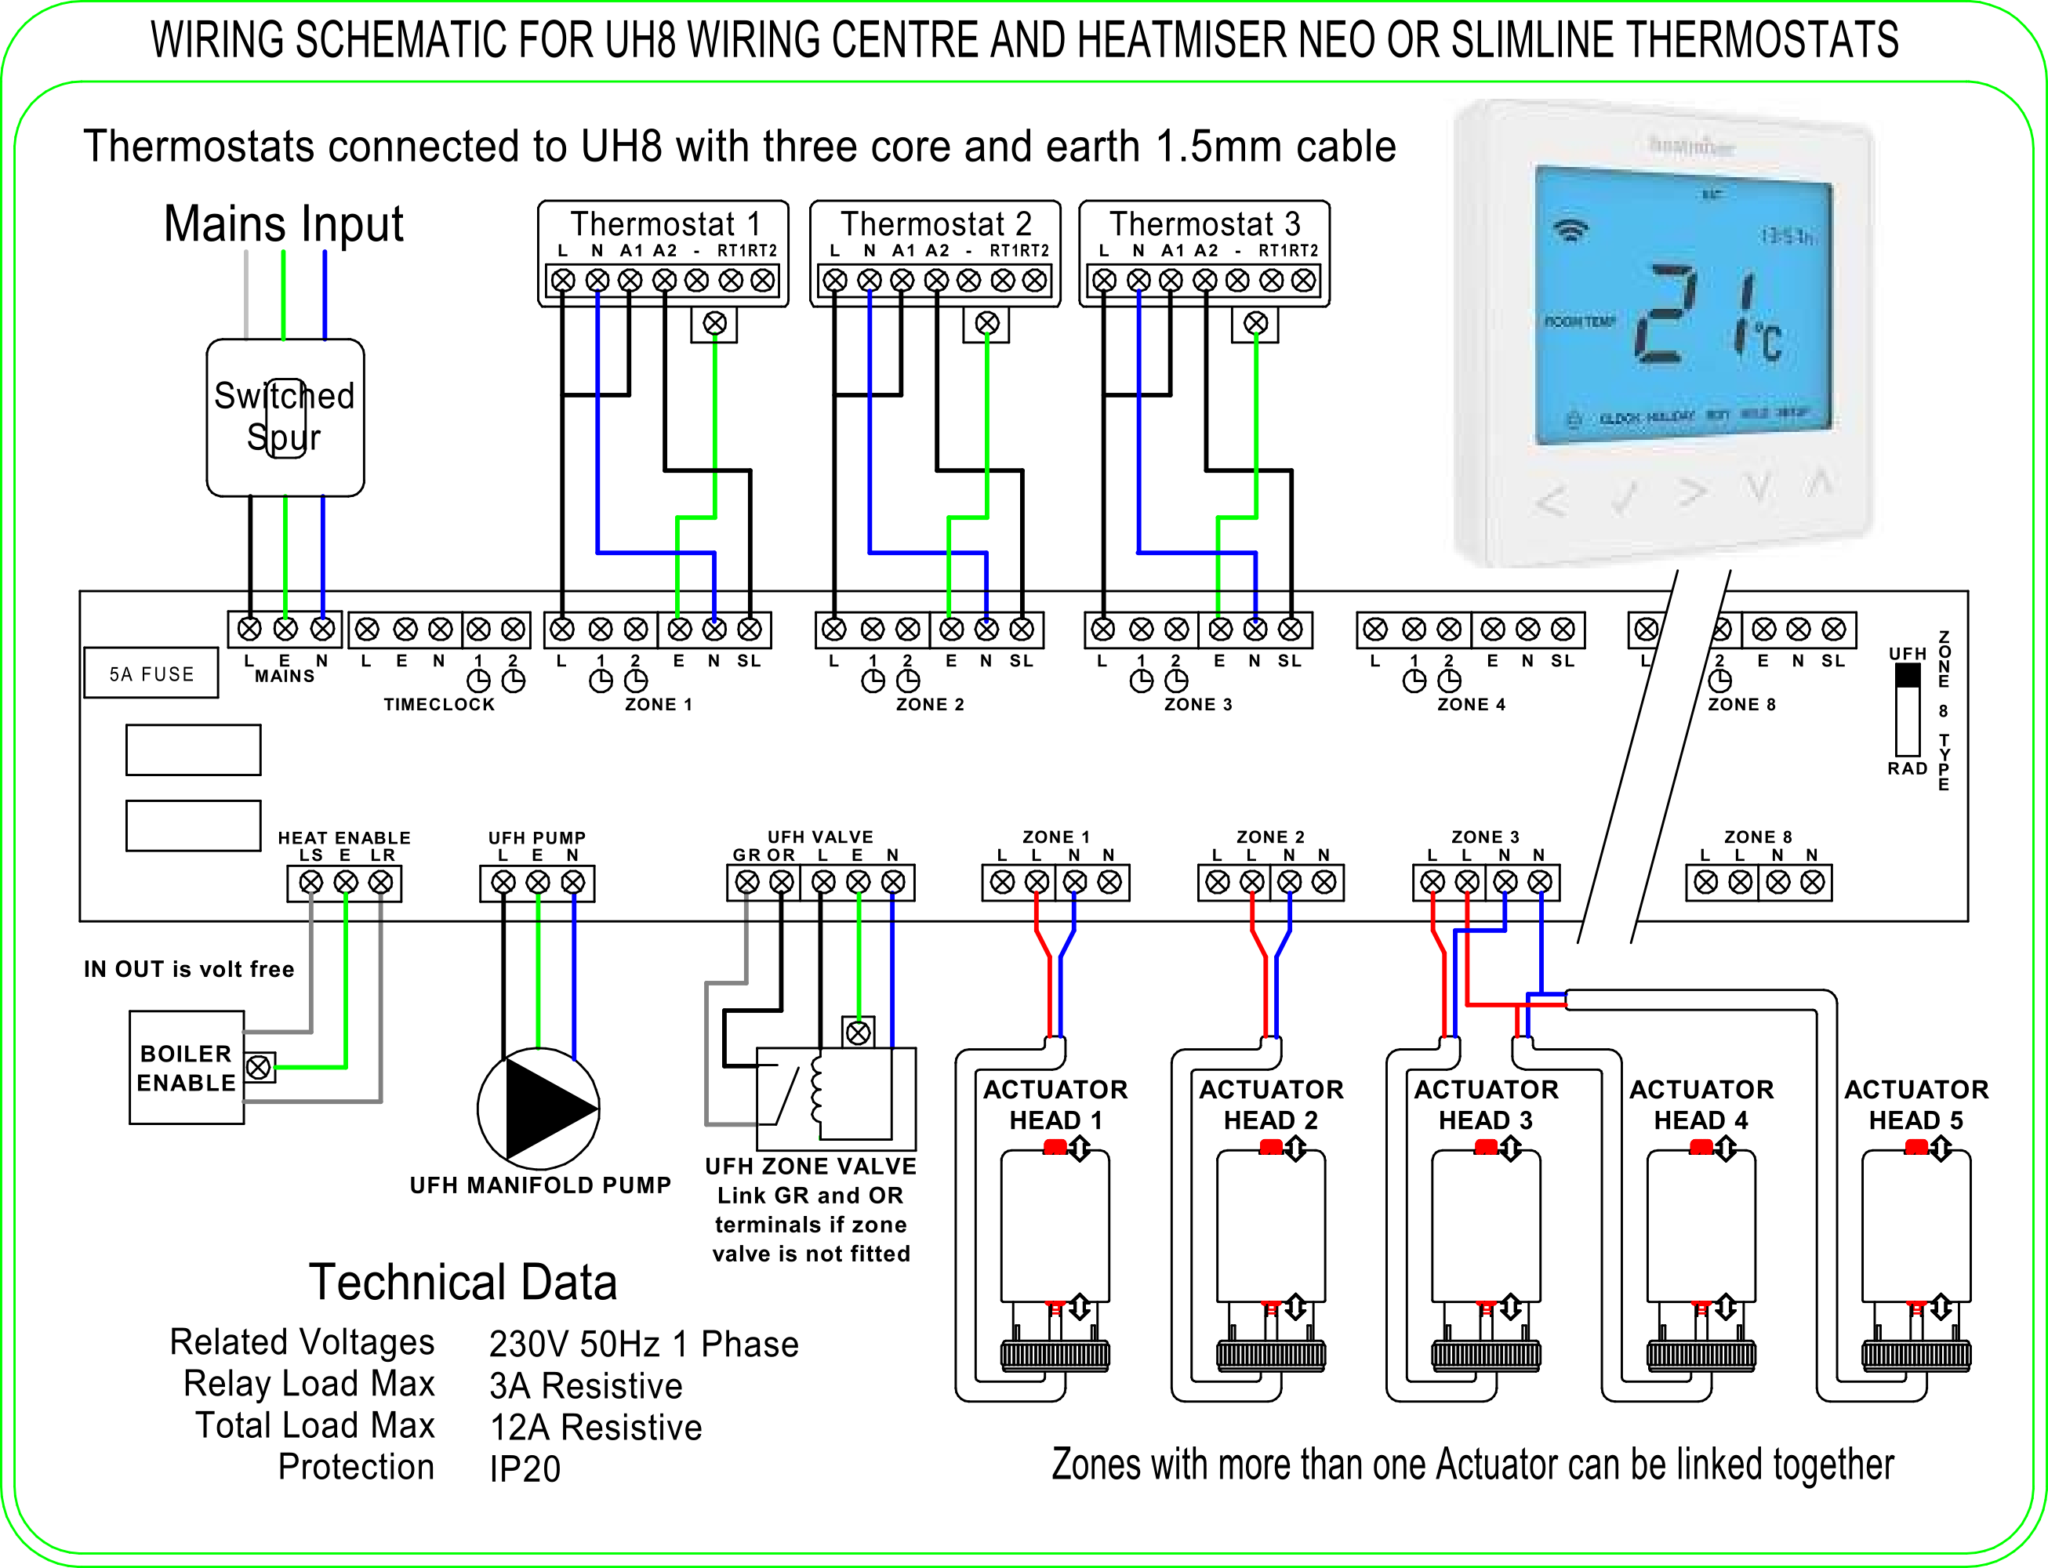
Heatmiser Touch Manual. Heatmiser Touchpad User Manual. Heatmiser Touch-RF Manual. Heatmiser UH4 Manual. Heatmiser UH8 Manual. Heatmiser UH8-N Manual. Heatmiser UH8-RF Manual. Heatmiser Manuals, Wiring Diagrams and Specification Documents - With over 30 years of experience within the underfloor heating and plumbing industry we are ideally.
Heatmiser Neostat v2 Programmable Thermostat UFH Parts & Design Ltd

Installing the Batteries 4 x AAA batteries have been supplied with the neoAir V2-M. To access the battery holder, push and release the compartment door located on the bottom face of the thermostat. The thermostat will inform you when the batteries need to be replaced by displaying the battery icon on screen.
Question Heatmiser Neo Retro Fit Wiring AVForums, 59 OFF
The next step is to join the neoStat 12v V2 to the neoHub, we recommend joining the neoStat V2 located nearest to the neoHub first. To add a neoStat 12v V2, follow these steps; • In the app, select ADD NEOSTAT, enter a preset or custom title, then press NEXT. • You now have two minutes to join the neoStat 12v V2 to the neoHub.
Low Voltage Smart Thermostat Heatmiser neoStat 12v

The Heatmiser neoStat v2 is a 230v programmable thermostat featuring illuminated touch keys. The neoStat v2 can be configured to work as a programmable thermostat or as a timer- so if you want to take control of your towel rails, or lighting - Neo offers you this and more! When paired to the neoHub G2 (sold separately) you can control your.
Heatmiser Neo Wiring Diagram Wiring Diagram Pictures
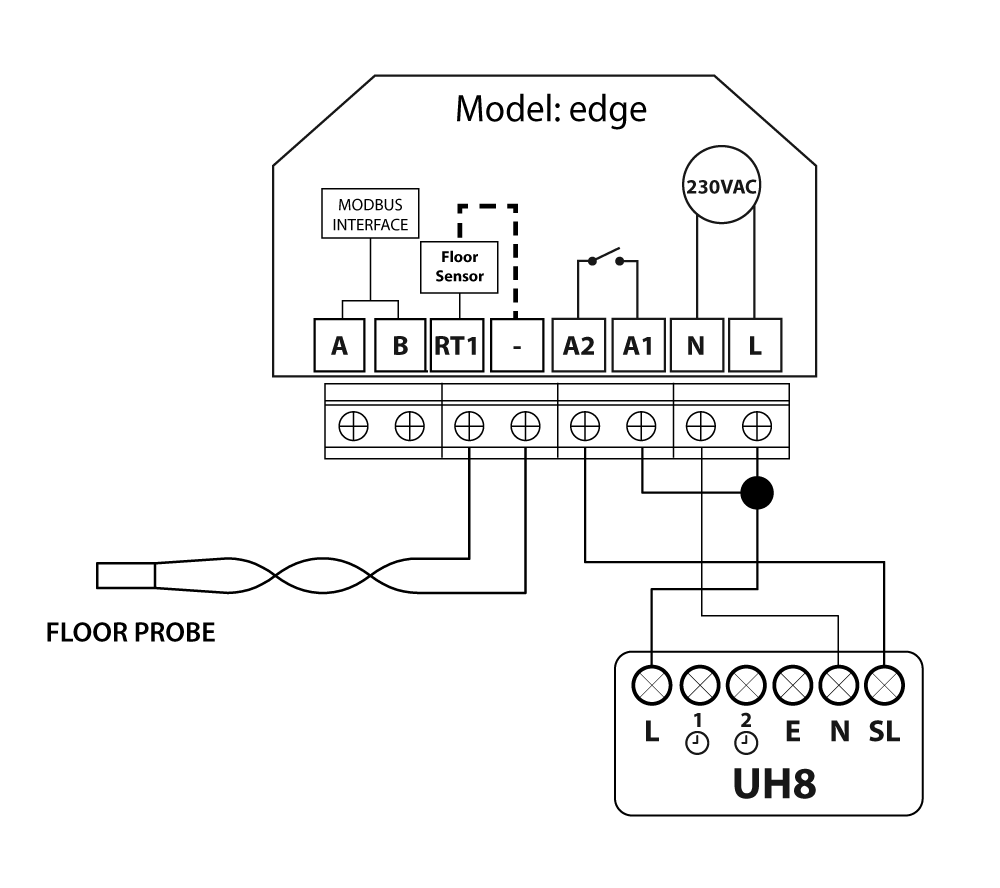
View and Download Heatmiser Neostat user manual online. 12V. neostat thermostat pdf manual download. Sign In Upload. Download Table of Contents Contents.. Page 29: Wiring Diagrams Wiring Diagram - neoStat to UH1 Section Header Connecting neoStat to the UH1 Remote 12VDC Air Sensor The UH1 allows connection of up to eight Floor 12 volt neo.
Ufh Wiring Diagram Fab Care

We have 1 Heatmiser neoStat-hw V2 manual available for free PDF download: Instruction Manual Heatmiser neoStat-hw V2 Instruction Manual (24 pages) neoStat series
Heatmiser Neo Wiring Diagram

Heatmiser UK Ltd Units 1-5 Shadsworth Business Park Mercer Way Blackburn, Lancashire BB1 2QU, UK Tel: +44 (0)1254 669090 Fax: +44 (0)1254 669091 Email: sales@heatmiser.com
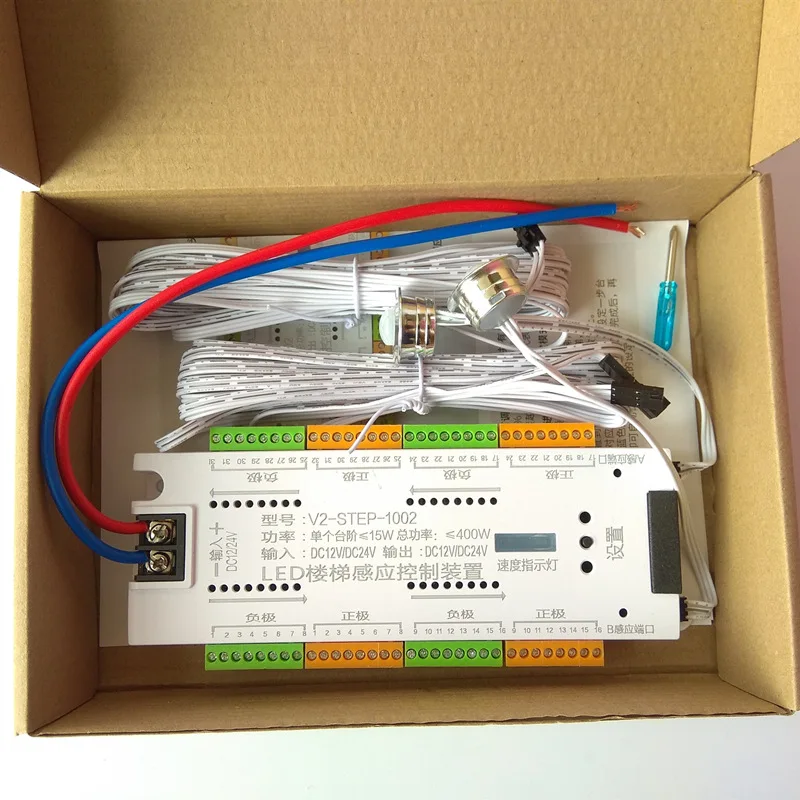
Mutil Funtion 36 Steps Sensor Controller Led Stair Light With Infrared Induction Control Stair
Contents hide 1 Heatmiser neoStat-hw V2 - Hot Water Programmer THERMOSTAT 2 Installation Procedure 3 Pairing the neoHub 4 Pairing the neoStat 5 Mode 2 - Time Clock 6 Locking /Unlocking 6.1 Setting the Switching Times 7 Standby 8 Adjusting the Optional Settings 9 Factory Reset 10 Wiring Diagram 11 Reference Heatmiser neoStat-hw V2 - […]
Technical Help Underfloor Heating Technologies
Note: The keypad lock indicator is only displayed when the lock is active. Unlocking the neoStat-hw V2 To unlock the neoStat-hw V2 press Tick once. The display will show 00:00 and you will need to enter the four digit pin number you set previously. Page 11: Setting The Clock Setting the Clock To set the clock, follow these steps.
Heatmiser Wifi Thermostat Wiring Diagram Wiring Diagram

Pairing the neoStat-hw V2. The next step is to join the neoStat-hw V2 to the neoHub, we recommend joining the neoStat located nearest to the neoHub first. To add a neoStat-hw V2, follow these steps; • In the app, select . ADD NEOSTAT, enter a preset or custom title, then press . NEXT. • You now have two minutes to join the neoStat-hw V2 to.
Heatmiser Neo Wiring Diagram Wiring Diagram Pictures
On the neoStat v2, navigate to the power Icon and hold tick for 5 seconds. Navigate to Setup. Press Tick twice. Your neoStat should show the radio signal on screen and the app should indicate the zone has been added successfully. If your neoStat doesn't pair, try the following steps. On the neoStat, navigate to the Power Icon and Hold the tick.
Thermostat Manual Dial for Underfloor Heating Systems by Heatmiser Insulation Superstore®
Heatmiser UK Ltd Units 1-5 Shadsworth Business Park Mercer Way Blackburn, Lancashire BB1 2QU, UK Tel: +44 (0)1254 669090 Fax: +44 (0)1254 669091 Email: sales@heatmiser.com
Heatmiser neoStat 12V v2 Programmable Room Thermostat Manual

Heatmiser neoStat 12V v2. A programmable room thermostat is both a programmer and a room thermostat. A programmer allows you to set "On" and "Off" periods to suit your own lifestyle. A room thermostat works by sensing the air temperature, switching on the heating when the air temperature falls below the thermostat setting, and switching.
Heatmiser Neo Wiring Diagram

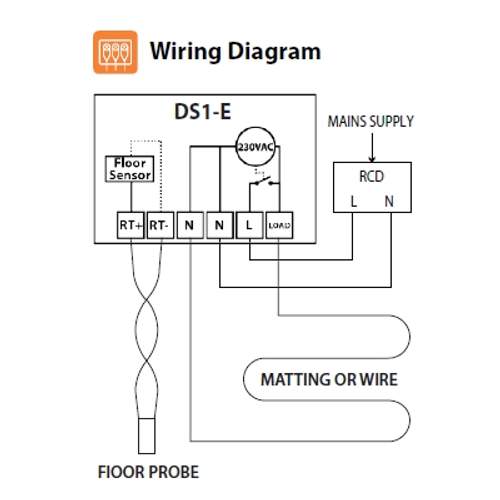
Terminate the thermostat as shown in the diagrams on pages 28-31 of this booklet. Note: For time clock wiring connections, terminate as shown on page 38. Step 3 Screw the thermostat back plate securely into the back box. Step 4 Clip the front of the thermostat onto the back plate, securing it in place with the retaining screw. Do